Sunday, 6 September 2015
Saturday, 5 September 2015
Sleek's Face Form Contouring and Blush Palette

Until I bought this palette, I did my contouring with a brown eye shadow. This was a little dark for me and while I could do it, it took a lot of blending and it wasn't really giving the sort of look I wanted because I was scared of putting too much on.
So I was actually on the look out for an eyeshadow with a lighter brown shade, when I came across these contour palettes by Sleek Makeup. I thought there wouldn't be a contour palette out there for me because my skin is quite pale, so I thought all the shades would be too dark for me. However, I noticed this palette was in 'Light' and when I tested it on my arm, I thought 'Yeah, this could work'.


I'm very pleased with the shades. The brown is exactly the right colour for me, it's quite cool in tone, so it works well with my pink undertones. The highlighter and blush work well too. I think that overall it achieves a 'dreamy' sort of look, yet it's very subtle, which is perfect for that 'natural' look.
 |
| Before contouring |
 |
| After contouring |
The only issue I would take is that the highlighter might give a shine that you might not want. You can see this especially on my nose. So I may still look out for a liquid highlighter that will give more of a matte finish.
Since my cheeks are really rosy, and this still shows through my foundation sometimes, I probably won't use the blush that much. But it will be good for if I do have paler days or if I want an extra rosy look.
 |
| I added the blush in this photo. I took these photos before doing my hair for the post below hehe. |
What are your thoughts on this contour palette? Have you used it?
If you liked this post, please don't forget to click 'Join this site' in the right sidebar or sign up for email alerts!
If you liked this post, please don't forget to click 'Join this site' in the right sidebar or sign up for email alerts!
|*|
Photos by Hayley☄
Written by Hayley☄
Thursday, 3 September 2015
Using Toni&Guy hot rollers

I've been trying to get the hang of rollers for a while, I built up a bit of a collection of velcro rollers, foam rollers etc. But I seriously could not get the hang of them. My hair would somehow end up all over the place and the result could be summed up in one word,
Frizz.
I'd seen hot rollers on a few Youtube hair tutorials and I thought of maybe looking into them, but I was hesitant over how much I would need to spend for a good set.
Then this beauty came down in price on an offer and it was too good to miss!


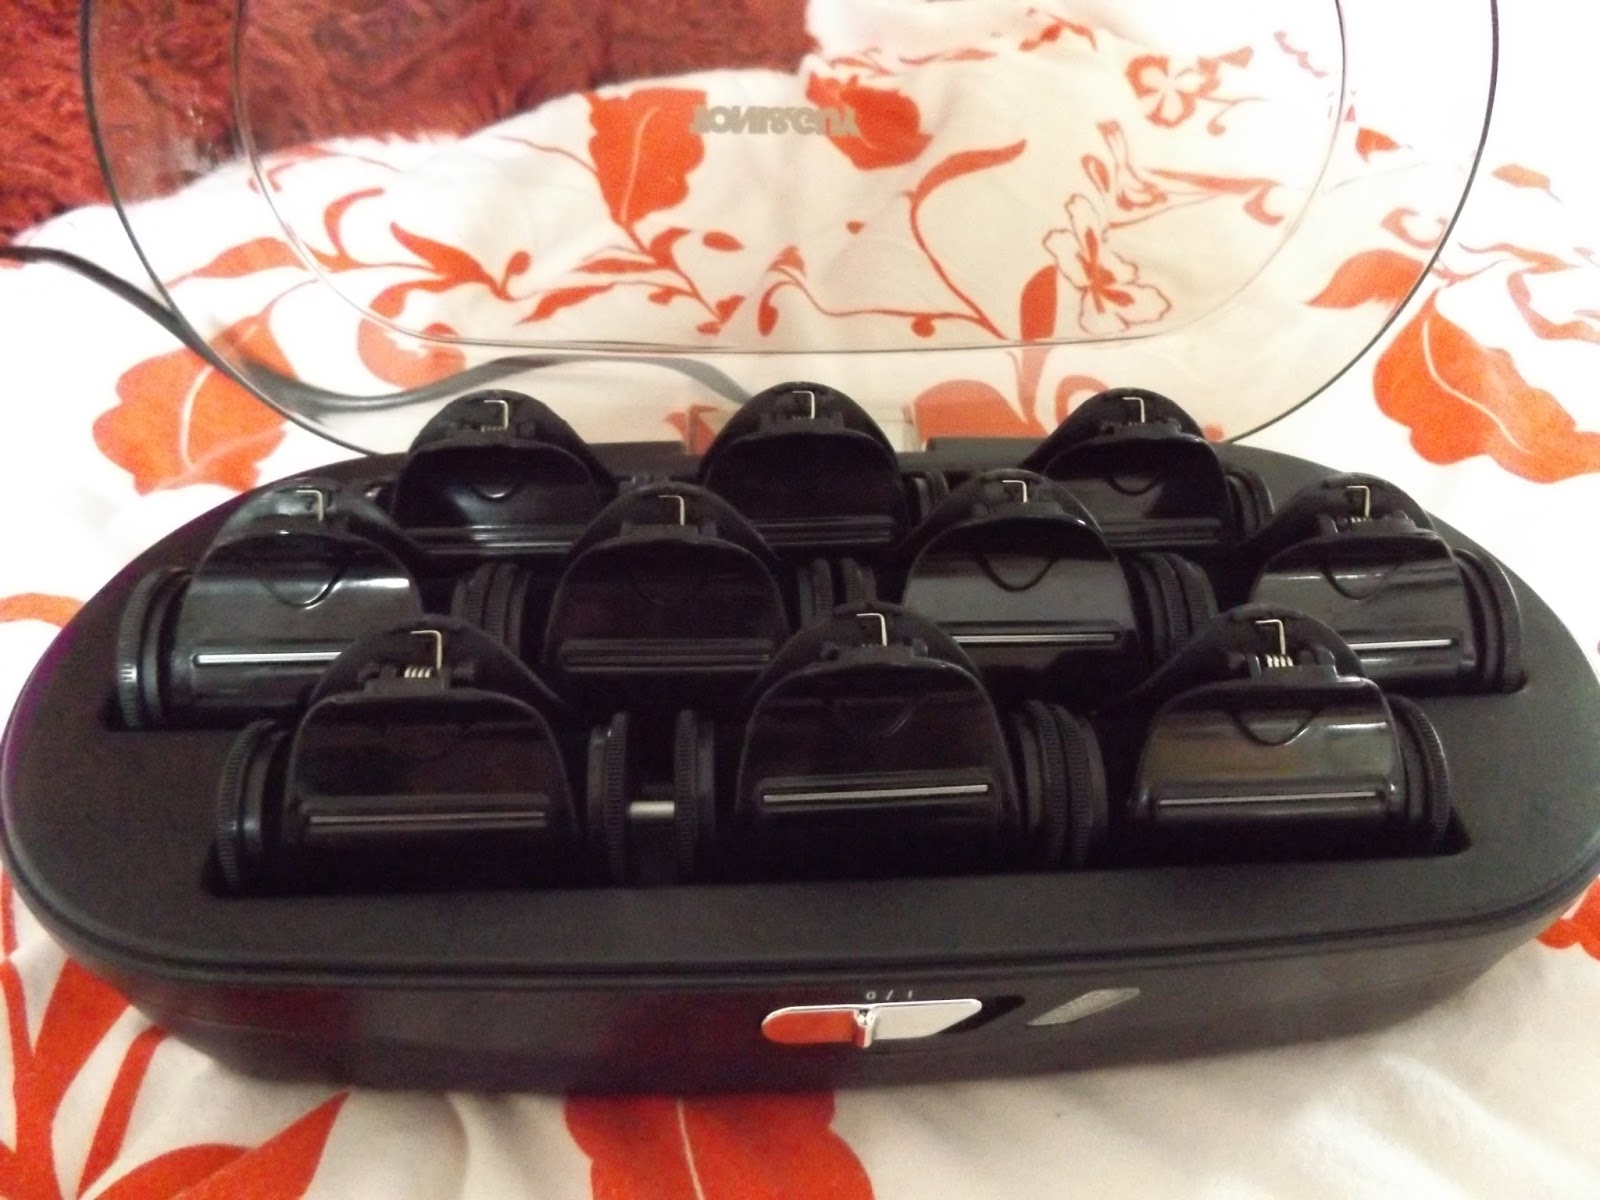
The set consists of ten heated rollers - four 'large' and six smaller ones - and a lidded case, which is also the heating device.


The rollers have this lovely, velvety texture. To be honest, I was expecting the large rollers to be bigger, more like the jumbo size rollers that are about. But, nevertheless, I am impressed by their performance, they make a really nice, volumous wave. The smaller rollers are good for getting right to by your roots if you want more volume. But I prefer the larger ones.

The rollers heat up fully in one and a half minutes and take at least ten minutes to cool down - which is really good for me, because I sometimes take ages putting them in right!
I'd seen hot rollers on a few Youtube hair tutorials and I thought of maybe looking into them, but I was hesitant over how much I would need to spend for a good set.
Then this beauty came down in price on an offer and it was too good to miss!

|*|
The set consists of ten heated rollers - four 'large' and six smaller ones - and a lidded case, which is also the heating device.


The rollers have this lovely, velvety texture. To be honest, I was expecting the large rollers to be bigger, more like the jumbo size rollers that are about. But, nevertheless, I am impressed by their performance, they make a really nice, volumous wave. The smaller rollers are good for getting right to by your roots if you want more volume. But I prefer the larger ones.

The rollers heat up fully in one and a half minutes and take at least ten minutes to cool down - which is really good for me, because I sometimes take ages putting them in right!
The thing that's great about heated rollers is that you use them on dry hair, unlike velcro rollers, which you use when you're hair is damp. This is good for me because,
1. By the time I've put them in right, I've had to take them in and out, which makes my hair frizzy.
And
2. I can't make that sort of commitment to my hair right after having a shower.
Also, it doesn't matter if you get it wrong, because you can just start over again! Or correct bits of hair you aren't quite happy with.

The plating on the clips holds the heat as well and gives a shiny, smooth look to the hair. When I use velcro rollers, pulling my hair away from the roller always makes a bit of frizz, so this aspect of the heated rollers is amazing in my opinion. The only thing I would say is that the rollers still fall out a little, or out of position, even when the clip is on. I've seen that some heated rollers have a sort of teeth clip on them, and I wonder whether that would be better. But I don't know if this is just because my hair has a very fine texture? I'm getting used to using them in a way which suits me anyway.

The plating on the clips holds the heat as well and gives a shiny, smooth look to the hair. When I use velcro rollers, pulling my hair away from the roller always makes a bit of frizz, so this aspect of the heated rollers is amazing in my opinion. The only thing I would say is that the rollers still fall out a little, or out of position, even when the clip is on. I've seen that some heated rollers have a sort of teeth clip on them, and I wonder whether that would be better. But I don't know if this is just because my hair has a very fine texture? I'm getting used to using them in a way which suits me anyway.
|*|
I re-watched a few tutorials and tried out their instructions, but they weren't really working out for me. So I've kind of been teaching myself and developing ways of putting them in.
I straighten the underneath layer of hair (my hair goes too full and poofy otherwise). I only do this a little bit, so it's still a bit wavy. I put the large rollers in the top layer and smaller rollers on the middle layers. I leave them in for about ten mins and do my make up or something. The rollers aren't fully cooled when I take them out, so they could be left in for longer, but I find it's enough time to set the curls.

After I've taken the rollers out, I shake out the curls a bit by putting my fingers at the roots of my hair and then I sort of blend the curls into the position I want.


Close up, a bit of frizz can be seen, but much less than when I use velcro rollers. Really happy with this purchase!

After I've taken the rollers out, I shake out the curls a bit by putting my fingers at the roots of my hair and then I sort of blend the curls into the position I want.


|*|
Photos by Hayley☄
Written by Hayley☄
Written by Hayley☄
Wednesday, 2 September 2015
September 1st mini haul
As I was passing through Cardiff yesterday, I stopped by to buy myself a few treats!


I was aiming to get a pair of shoes, but nothing tingled my fancy enough. However, I did get a book I've been intrigued by recently, which is Miss Peregrine's Home for Peculiar Children by Ransom Rings. Here is the blurb:
A mysterious island. An abandoned orphanage. And a strange collection of very curious photographs. It all waits to be discovered in Miss Peregrine's Home for Peculiar Children;, an unforgettable novel that mixes fiction and photography in a thrilling reading experience. As our story opens, a horrific family tragedy sets sixteen-year-old Jacob journeying to a remote island off the coast of Wales, where he discovers the crumbling ruins of Miss Peregrine's Home for Peculiar Children. As Jacob explores its abandoned bedrooms and hallways, it becomes clear that the children who once lived here - one of whom was his own grandfather - were more than just peculiar. They may have been dangerous. They may have been quarantined on a desolate island for good reason. And somehow - impossible though it seems - they may still be alive. A spine-tingling fantasy illustrated with haunting vintage photography. Miss Peregrine's Home for Peculiar Children will delight adults, teens, and anyone who relishes an adventure in the shadows.
A mysterious island. An abandoned orphanage. And a strange collection of very curious photographs. It all waits to be discovered in Miss Peregrine's Home for Peculiar Children;, an unforgettable novel that mixes fiction and photography in a thrilling reading experience. As our story opens, a horrific family tragedy sets sixteen-year-old Jacob journeying to a remote island off the coast of Wales, where he discovers the crumbling ruins of Miss Peregrine's Home for Peculiar Children. As Jacob explores its abandoned bedrooms and hallways, it becomes clear that the children who once lived here - one of whom was his own grandfather - were more than just peculiar. They may have been dangerous. They may have been quarantined on a desolate island for good reason. And somehow - impossible though it seems - they may still be alive. A spine-tingling fantasy illustrated with haunting vintage photography. Miss Peregrine's Home for Peculiar Children will delight adults, teens, and anyone who relishes an adventure in the shadows.
Fascinating or what?!

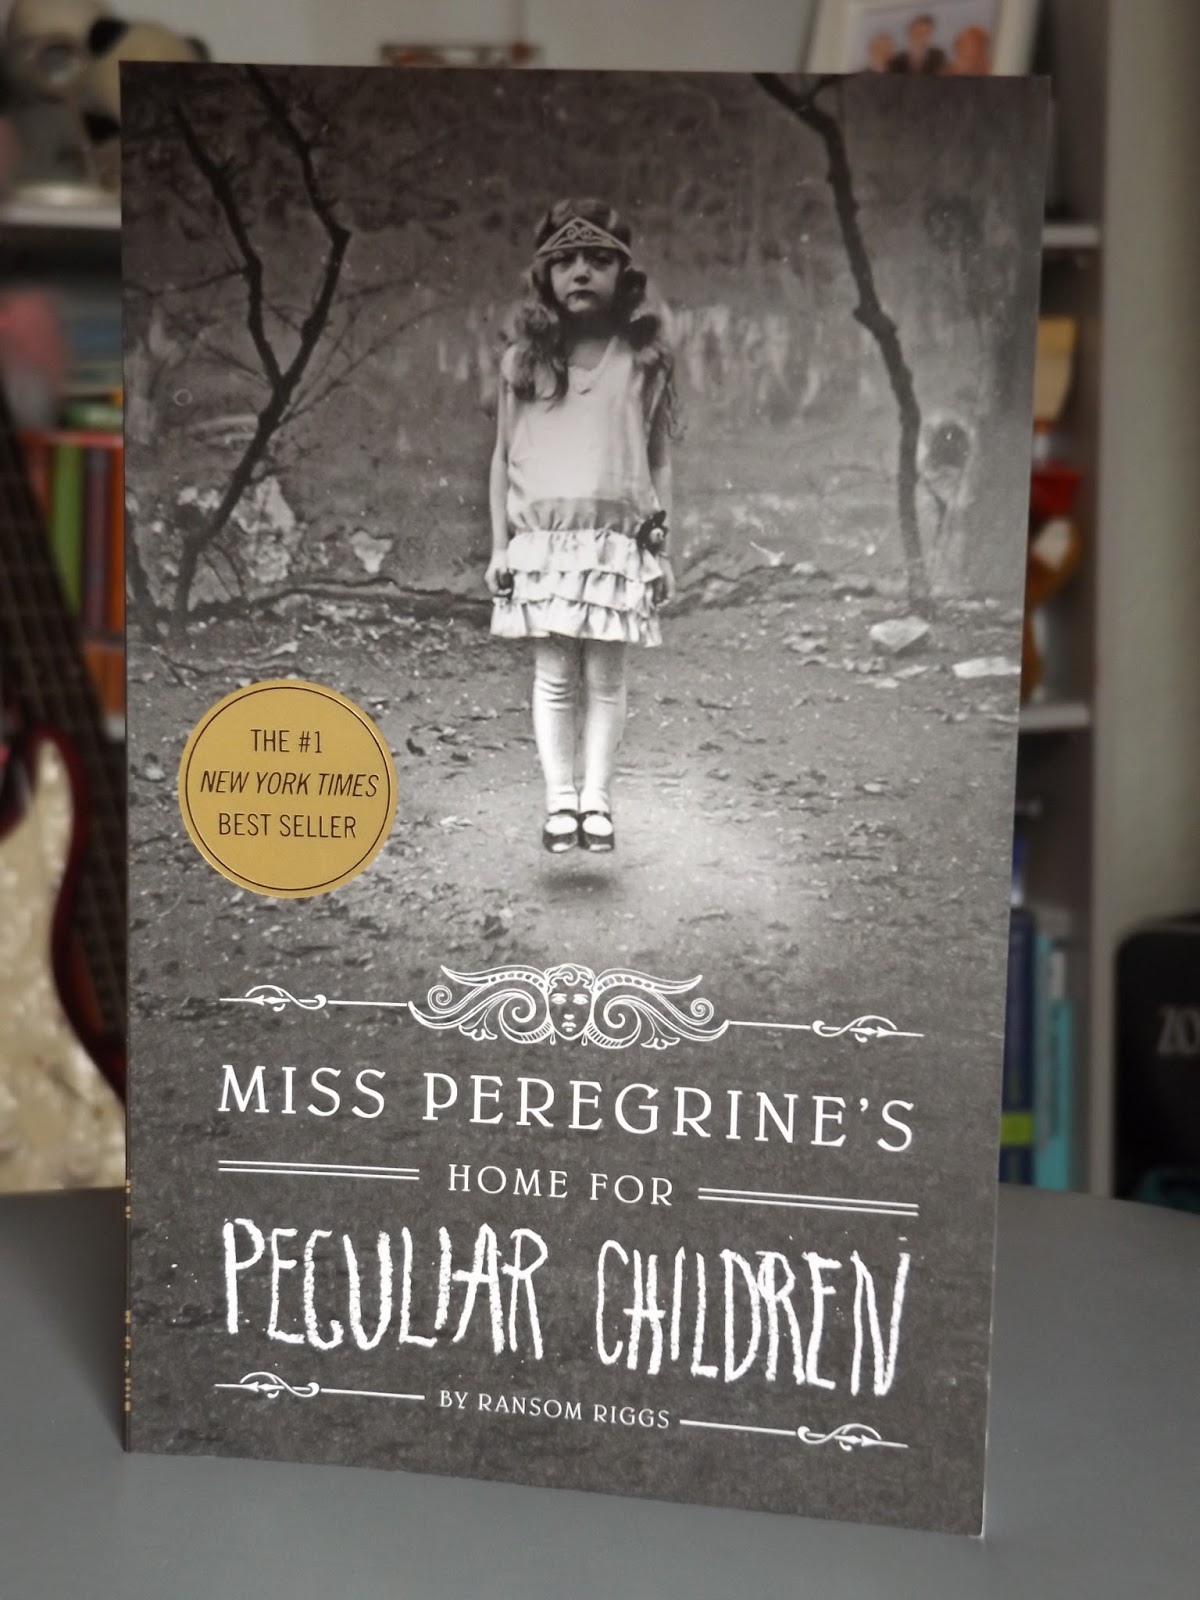
It's quite heavy for the size of the book. There are photos throughout the book, which are part of the story. I won't post them in case there are any spoilers. I really can't wait to get reading!
|*|
I had these two gel nail varnishes by Barry M. I haven't gotten around to using gel nail varnishes, as I've been living in a cave apparently, so I'm quite excited to see what they are like.


The blue shade caught my eye right away because it's such a gorgeous colour. It was the last one left so I was lucky there!
|*|

I bought this contour palette by Sleek for light skin. I've previously done contouring with a brown eye shadow, but it takes a long time to blend because it's a little bit to dark for my skin really. So I'm hoping the shade in this set will be better. I'm also interested in trying out the highlighter shade and seeing what that's like.


I wasn't aiming to get any t-shirts, but when I saw these in Primark, I just thought they were amazing. I'm not normally one to get t-shirts with slogans on the front and such, but I love Disney and these sort of sum up my life.
|*|


I wasn't aiming to get any t-shirts, but when I saw these in Primark, I just thought they were amazing. I'm not normally one to get t-shirts with slogans on the front and such, but I love Disney and these sort of sum up my life.
|*|
Photos by Hayley☄
Written by Hayley☄
Written by Hayley☄
Subscribe to:
Posts (Atom)